 Index
IndexAn introduction to creating dialog
This tutorial will get you started with writing in-game dialog.
Preparation
Create the directory for your .dlg scripts (see the related tutorial if you have problems), we're calling this one "dlgtutorial".
Download the level used in this tutorial HERE. It's a simple room with Aida standing in it, and there's a door behind her that can't be opened (yet). Aida is using "inert.u2s" (which comes with the game) so that she stands still and doesn't wander around.
Create an empty text file and save it as "aidadialog.dlg" in your "../Dialog/dlgtutorial" directory. This is the dialog file that we'll use. Make sure that your text editor doesn't try to append a .txt extension when you save the file!
Next, open the LevelProperties by pressing F6 or clicking View ->Level Properties, and under LevelInfo, make sure the MapName field contains the same string you used for the name of the dialog file: dlgtutorial.
Select Aida and open her properties. Open the "Dialog" tab and enter "Aida" in the "Speaker" slot. That's the name that Unreal 2 will try to match against the diaog files. Save the map.
The first dialog nodes
First let's take a look at the dialog that you're about to create. Here's a flowchart of the conversation:
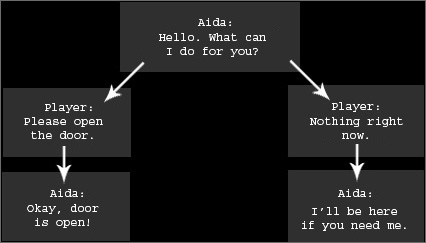
Pretty straightforward, when addressed Aida will ask what she can do for the player. The player can ask her to open the door, she will do it and reply with "Okay, door is open!". If the player doesn't want anything from Aida she'll say "I'll be here if you need me."
A conversation is defined by dialog nodes. Let's create the first dialog node of Aida greeting the player. Open the empty
"aidadialog.dlg" file and add the following lines:
[AidaDialog]
Speaker=Aida
LongText=Hello. What can I do for you?
With that you have created a functional dialog node (even though you won't be able to speak to Aida just yet). Let's review the lines:
- [AidaDialog] - this is the title of the dialog node, enclosed by [ ] characters. Everything following the title (until the parser finds a new [ character) is treated as part of the same dialog node.
- Speaker= - who this node belongs to, in this case Aida. This line is matched against the "Speaker" property of each pawn in the level. There's one hardcoded Speaker string: "Player", which always means the player character.
- LongText= - The written text. If you talk to Aida the subtitle will read "Hello. Do you want me to open the door?"
Let's finish the dialog file to make an actual conversation possible. Add more lines to the .dlg file so that it looks like
this:
[AidaDialog]
Speaker=Aida
LongText=Hello. What can I do for you?
NextNode=AidaDialogA
[AidaDialogA]
Speaker=Player
ShortText=Open door
LongText=Please open the door.
Play the level, you should now get a use reticule around Aida and be able to talk to her.
Now that you have a working dialog let's look at the additional commands we used:
- NextNode - creates a connection to another dialog node. If the speaker of that node is not "Player" the node will happen automatically. If the speaker of that node is"Player" the dialog system uses those nodes as dialog options, displaying the ShortText as choices. When the player picks one the LongText gets displayed.
- ShortText - The text that gets displayed on screen as dialog option. Only useful if the speaker of the node is the player.
Conversations
You just created a working dialog file and were able to talk to Aida when you played the level, but how and where did you
specify the active conversation or tell Aida about her dialog file? The answer is simple: you don't have to. When a level is
loaded and a dialog folder exists that matches the MapName Unreal 2 will automatically scan all .dlg files that it finds and
cache the available conversations, which are then automatically available in-game. When you try to talk to somebody the game
checks if there's a valid conversation between you and the NPC (the game scans the Speaker strings), and if one exists that dialog
will be chosen
That also means that the game has to decide on one conversation if there's multiple active topics, and the conversation that
the game picks might not be the one you want. Read the end of this tutorial to see how you make sure that the game always
picks the topic that you want. For now you don't have to worry about it, because there's only one active topic between you and
Aida, anyway.
The current example is very simple, the .dlg contains a two-node conversation between the player and Aida. When you use
Aida Unreal 2 will know exactly what to say and where to begin the dialog (the first node of the .dlg file), so the level
works. To make things a bit prettier (and prepare you for more complex dialog files with multiple possible conversations) we'll
tell the game which conversation topics are available, and we'll do that with the [Root] node. Add two lines to "aidadialog.dlg"
so that it looks like this:
[Root]
Conversation=AidaDialog
[AidaDialog]
Speaker=Aida
LongText=Hello. What can I do for you?
NextNode=AidaDialogA
[AidaDialogA]
Speaker=Player
ShortText=Open door
LongText=Pplease open the door.
Pretty easy, now the game knows that there's a conversation and that it starts with the [AidaDialog] node. As you add additional topics for Aida and the player you add additional Conversation= lines on the top. Check out any of the .dlg files in the Atlantis folders for examples.
Finishing the dialog
We've only created two nodes of the flowchart, let's complete the entire dialog:
[Root]
Conversation=AidaDialog
[AidaDialog]
Speaker=Aida
LongText=Hello. What can I do for you?
NextNode=AidaDialogA
NextNode=AidaDialogB
[AidaDialogA]
Speaker=Player
ShortText=Open door
LongText=Please open the door.
NextNode=AidaDialog1
[AidaDialogB]
Speaker=Player
ShortText=Nothing
LongText=Nothing right now.
NextNode=AidaDialog2
[AidaDialog1]
Speaker=Aida
LongText=Okay, door is open!
//end
[AidaDialog2]
Speaker=Aida
LongText=I'll be here if you need me.
//end
The .dlg is still very straightforward. Aida greets the player and gives the player two choices. Because the [AidaDialog] node has two NextNode lines both leading to player nodes the game will show both nodes on the screen, displaying the ShortText= string as the dialog option. Each node (when picked by the player) then leads to the appropriate reply from Aida.
Events
Aida might tell you that she'll open the door for you, but females have been known to lie and Aida is no exception ;) Let's add the event so that she actually does what she says. There's two ways to send events from dialog nodes: Event= and ExitEvent=.
Event= takes a % parameter at which the event actually happens. It defaults to 0, if you use "Event=ExampleName" in a node the event "ExampleName" will get triggered right at the beginning of the node. Event=ExampleName,,50 (two commas!) sends the event when 50% of the node are over. Please note that high percentages are NOT reliable and might get swallowed (especially in slow framerates). Event=ExampleName,,99 is not guaranteed to happen (everything from ,,90 down is pretty safe, though).
ExitEvent= sends the event when the entire conversation is over. When the dialog encounters an ExitEvent line it caches
the event and will trigger it when the last node of the dialog has finished. ExitEvent is reliable, use it when you want to
be certain that an event happens.
Let's add the event to open the door to our Aida dialog:
[AidaDialog1]
Speaker=Aida
LongText=Okay, door is open!
ExitEvent=Door
//end
Note that you could also have put the ExitEvent in the [AidaDialogA] node, where the player picks the positive answer. ExitEvents that have been set occur at the end of a conversation, not at the end of a dialog node.
SpokenMax
You'll have noticed that you can only talk for Aida once, after that the use reticule doesn't appear again. If you answered "No" to Aida's question you're screwed because there's no way to go back and ask Aida again!
The dialog disappears because each dialog node has an internal counter of how often it can happen, and that counter
defaults to 1. Once a node has been spoken it gets deleted from the game (and without the deleted node the game can't find a
valid dialog between you and Aida anymore, so you can't use her). To change this you use the SpokenMax= command:
[Root]
Conversation=AidaDialog
[AidaDialog]
Speaker=Aida
-> SpokenMax=5
LongText=Hello. Do you want me to open the door?
NextNode=AidaDialogA
NextNode=AidaDialogB
SpokenMax lets you set how many times a dialog node can happen, the default is 1. To make a node happen indefinitely you use SpokenMax=0. This node will never go out of scope.
Go ahead and add SpokenMax=0 to every dialog node on your file. In a normal game this doesn't make much sense, but for this tutorial we'll use it to teach some additional functionality. Play the game to make sure that you can talk to Aida as often as you want.
Enabling and disabling nodes
Now that you've added "SpokenMax=0" to all nodes you can run into the odd situation that the door has been opened by Aida and the "Open door" choice doesn't make much sense anymore (it's a TriggerOnce door that will stay open forever), but still gets displayed. To remedy that you'll disable "Open door" once Aida has done what you asked.
Modify the [AidaDialog1] node as follows (don't actually type the ->):
[AidaDialog1]
Speaker=Aida
SpokenMax=0
LongText=Okay, door is open!
ExitEvent=Door
-> DisableNode=AidaDialogA
//end
Play the game. Talk to Aida and use the "Nothing" option first. Talk to her again and pick "Open Door". Talk to her a third time. The "Open door" node [AidaDialogA] has been disabled, now you can only pick "Nothing".
Note that you could have achieved the same result without disabling a node: Set all but the "Open door" node to SpokenMax=0. Because you don't set SpokenMax=0 for the "Open Door" answer this node will default to 1 and disappear after it has been selected once. When you talk to Aida again she'll only display the "Nothing" choice.
DisableNode= has a counterpart: EnableNode=, which you can use to reactivate nodes that have been disabled. All nodes are enabled by default. If you want a node to start off disabled you can do so by adding the line Enabled=false to the dialog node.
Dialog and .u2s scripts
If you want an NPC to initiate dialog with the player you can do so easily with the dialoginitiate:
dialoginitiate [SpeakerToTalkTo] (DialogNode) - makes the NPC initiate dialog with SpeakerToTalkTo. If SpeakerToTalkTo isn't set the game will assume the player.
You can also enable and disable nodes from the .u2s script:
dialogenable (DialogNode)
dialogdisable (DialogNode)
More dialog options
There's a lot more options that can be set in a node, but this tutorial should cover the basics. Remember, if an NPC has more than one topic (set in the [Root] node with Conversation=) you have to always keep all but one conversation disabled or the game will get confused, it won't know which topic to choose and will pick a random one. Disable the first node of all conversations that you don't want active at that point in the game and enable them later through the NPC's .u2s script.
Something that this tutorial doesn't cover is the use of the SoundFile= line, but it should be self-explanatory. If you're recording spoken dialog for your level search any .dlg file that came with the game for examples. SoundFile= can reference .ogg files (in the ../Voice directory) or .wav files (in an .uax file).
Tutorial by Matthias Worch