 RSS Feed
 Index
IndexCreating terrain
Creating terrain is a bit more complicated than in the UT2003 editor, here's a step by step guide of how to do it. Don't forget to save your map after every step, UED likes to crash whenever terrain editing is involved.
Step by step guide
Create your heightmap in a imaging program of your choice. The resolution should be a power of 2 (64x64, 256x256 etc.) and it should be 8 bit. It doesn't actually have to be grayscale, but it's easier to do it this way. Save the texture as .pcx or .bmp file. You can also download my initial heightmaps.
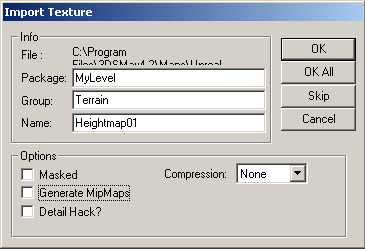
Import the texture into the MyLevel package. MyLevel is what gets saved with the actual .un2 file, and for heightmaps it's best to store them in this group so that they get saved whenever you save the map. Otherwise you might save the level but forget to save the texture package with your heightmaps and lose work. Note that UnrealEd will only save resources in MyLevel that are actually referenced somewhere in the level! If you import a texture (or static mesh) into this group but don't use it in the map it will NOT be saved when you save the map!
Refer to the picture below for the options you have to use when importing. We'll call this texture "Heightmap01" and store it in the "Terrain" group. Do not use any compression and turn of mipmap generation (this is important!)
Substract a a big cube from the level in which your terrain will exist. Place a U2ZoneInfo in that box and set bTerrainZone (under the ZoneInfo tab) to true.
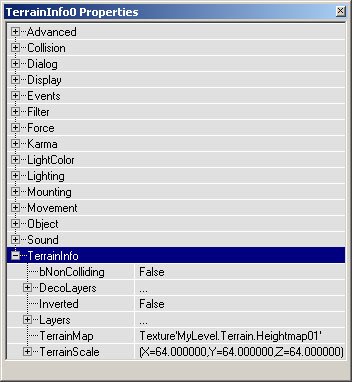
Place a TerrainInfo in the map. Set the TerrainMap field to your "Heightmap01" texture. Rebuild the map. Don't try to do anything else to TerrainInfo (that includes moving it) before you have set the texture and rebuilt the map or UED will crash! Now would probably be a good time to save the level anyway, since you have referenced the heightmap texture and it will be saved with the level.
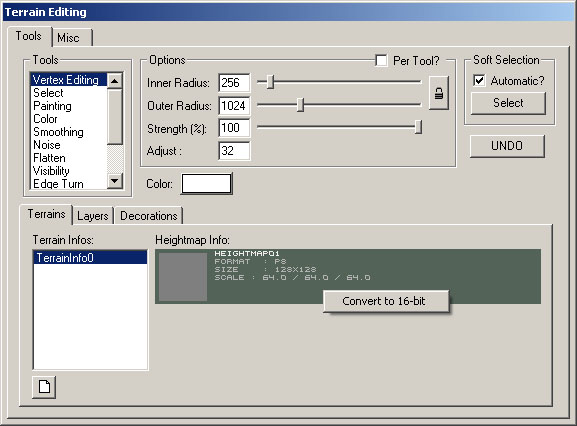
Open the terrain editor (the little mountain icon in the left toolbar). Convert your heightmap to 16 bit by right-clicking on the field. This way your heightmap can have a lot more steps than an 8 bit texture could have (65536 instead of 256, to be precise).
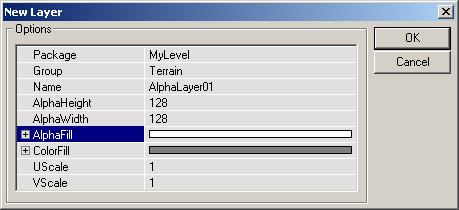
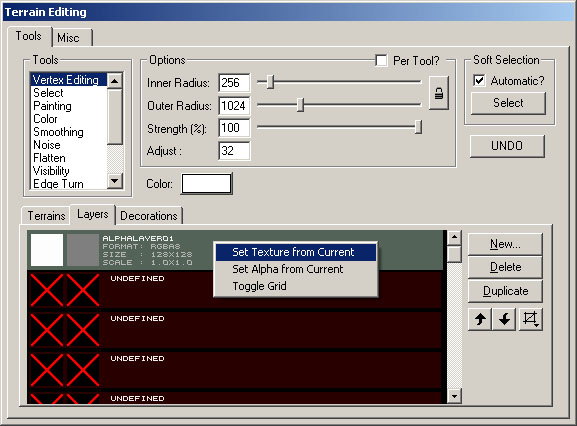
Open the Layers tab and click on New.... Use MyLevel/Terrain as package/group, and call it "AlphaLayer01" (or something more descriptive like "GroundLayer" if you like). Make sure that the resolution of the new layer matches the resolution of your heightmap, if you're using a 128x128 heightmap make your texture layers are also 128x128! Open the AlphaFill menu and set it to pure white. Since this is your base layer you want the texture to show at full strength everywhere, and setting the alphachannel to white does that (black=invisible, white=fully visible).
Pick a good texture for the ground (try Mission_02.utx for a start) and select it. Right-Click on the AlphaLayer and choose "Set Texture From Current".
Rebuild the level, the terrain will finally show up (it existed before, but was invisible because it had no textures). If you don't see the terrain immediately it might be outside the world, move the TerrainInfo down and then move the camera up until you can find the terrain. Or make the box bigger. You might also want to turn on terrain rendering in the Top viewport (T key) to see it there.
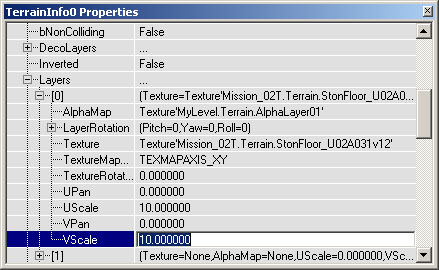
To change the terrain's dimensions and to easily change the scaling of the textures open the properties of the TerrainInfo and modify the TerrainScale values or UScale/VScale values of the texture.
You can now select and then modify heightmap with the terrain editor (Vertex Editing, Flatten etc.) by selecting some vertices and pressing the CTRL key while you drag the mouse. Note that the affected terrainsectors will turn black until you add a light (with a big enough radius to shine on them) and rebuild lighting. You'll probably want a SunLight (tutorial coming in the future).
Create a second Alphalayer, but use Alphafill=black this time. This makes the entire alphamap invisible by default and you can paint it on top of your base layer where you need it.
Set a texture for this alphamap and use the Paint function to paint the new texture onto the landscape.
You're done :)
I hope that this gives you a good idea of how you create terrain in U2. You can download a sample map of this tutorial here. It was created by repeating the steps of this tutorial. Use it to experiment with the terrain editor.
Tutorial by Matthias Worch